• About
  • Contact Me

Little Green Cheese

Cheese making at home with Gavin Webber the Cheeseman

  • Home
  • Blog
  • Cheese Courses
  • Cheese eBooks
  • Podcast
  • Videos
  • Cheese Making Kits
  • Support Me!
  • Live!

Pepper Jack, Son of Monterey

19/07/2011 By Gavin Webber Leave a Comment

Pepper Jack cheese is a variation on Monterey Jack which hails from the Monterey area in California.  It was bought over by the Spanish via Mexico and was originally known as Queso del Pais.

I made this cheese quite some time ago and here it is fresh out of the press around the 25th May 2009.  I waxed it after it had been touch dried.

Anyway, we cracked it open on the 1st August, after having left it to ripen for a good couple of months.  The recipe stated that it should ripen for one to three months, so I thought that two was a safe bet.  And a safe bet it was.  The end result was a crumbly, white cheese with a decent kick due to the organic chili flakes.  Both Kim and I agreed that it was well worth making and that it tasted divine.

Kim, kids and friends believe that my signature cheeses so far are Wensleydale, Caerphilly and Pepper Jack.  I tend to agree, but since then they have sampled my Emmental, Stilton and Parmesan.  They love them all!So where’s the recipe I hear you all asking?  Well, hold your horses, here it is.

Pepper Jack Cheese

Makes about 850 gm (2 pounds)

  • 8 litres (2 gallons) whole milk
  • 1/8 teaspoon Direct set Mesophilic culture
  • 5 ml Rennet mixed with 60 ml non-chlorinated water
  • 1 ml Calcium Chloride if using homogenised milk
  • 1 Tablespoon non-ionised salt
  • 1 teaspoon hot chili flakes
  • ½ cup (125 ml) water

Boil the chilli flakes in the water for 15 minutes.  I bought to the boil and just simmered and when it looked like it was going to boil dry, I added another 60 ml of water at about the 10 minute mark.  Strain and remove the chilli flakes and set aside the chili water.  I used my home-grown birds eye chilli that were sun-dried on the bush.

Add the chili water to the milk and stir well.  Using a double boiler, heat the milk to 31°C (88°F). If using homogenised milk, add calcium chloride to ¼ cup of unchlorinated water and mix into the milk gently.   Add Mesophilic starter, mix well for a minute, raise the temperature to 32°C (90ºF), cover and allow milk to ripen for 30 minutes.

Keeping the temp at 32°C, add the diluted rennet and stir for one minute.  Cover and let sit for forty-five minutes.  Check for a clean break and cut the curds into 6mm (¼”) cubes.  Maintain the target temp and stir the curds for forty minutes.

Gradually raise the temp to 38°C (100°F) which should take about thirty-five minutes.  Stir frequently to keep the curds from matting.  Once the target temp is reached, maintain for 30 minutes and continue stirring (your arms should be sore by now ;-)).  Let the curds rest for five minutes.

Pour off the whey to the level of the curds, taking care not to lose any of the curds.  Let the curds rest for an additional thirty minutes, however stir every 5 minutes to prevent the curds from matting.  While the curds are resting ensure that the target temp of 38°C (100°F) is maintained.  Line a colander with a sterilised cheese cloth and spoon the curds into the colander and toss through the salt and the boiled chili flakes.  Blend well with your clean hands, then let the curds drain for five minutes.

Line a 900g mould with cheesecloth, and fill with the curds.  Cover the curds with the corner of the cheese cloth, top with a follower, and press at 5kg (10lb) for fifteen minutes.  Remove the cheese from the press, and slowly, carefully unwrap it.  Turn the cheese over, rewrap it in the cloth and press at 15kg (30lb) for thirty minutes.  Repeat the unwrapping and turning process, this time pressing at 20kg (40lb) for 12 hours.

Remove the cheese from the press, and take it out of the mould and unwrap the cheesecloth.  Place the cheese on a cheese mat and board and let air dry at room temperature until it is dry to touch (usually 2-5 days).  Mine took 4 days to dry in Autumn.  Turn twice daily to allow for even drying.

Wax the cheese and allow it to ripen for one to three months in a humid cheese cave at 13ºC (55ºF) at 80-85% humidity.  Don’t forget to turn weekly to evenly distribute the fats and flavour.

We have managed to make the cheese last for three weeks, eating a little every few days.  I have learnt that if I cut the wheel into quarters and rewax three-quarters, then Kim and I are just a little more hesitant to scoff the whole lot in one weekend.  Once I rewax, I place them in the normal fridge at 4ºC to inhibit the ripening process.  As Dorothy, my cheese instructor once told me, “Cheese is a living organism and you should treat it with the respect it deserves”.

I highly recommend this cheese.  It takes a bit of stirring, however if you are new to the process of making cheese, then give it a go if you like a bitey yet mild cheese.  It is very satisfying to make and to finally eat.

You certainly don’t need any fancy crackers to enjoy this cheese.  Just a plain water cracker or wafer will do fine.

Filed Under: Recipes Tagged With: Pepper Jack

Emmental Cheese

17/07/2011 By Gavin Webber 12 Comments

This version of Swiss cheese is quite easy to make.  I have had good results with Emmental cheese so far, and have made it about 4 times now. This cheese has a fantastic nutty flavour, and each time I make it, I end up with different hole sizes.  So what makes the holes?  Well, Wikipedia states;
“The cheese originally comes from the Emme valley in the canton of Bern. Unlike some other cheese varieties, the denomination “Emmentaler” was not protected (“Emmentaler Switzerland” is, though). Hence, Emmentaler of other origin, especially from France and Bavaria, is widely available and even Finland is an exporter of Emmentaler cheese.
Emmentaler is a yellow, medium-hard cheese. Failure to remove CO2 bubbles during production, due to inconsistent pressing, results in the large holes (“eyes“) characteristic of this cheese. Historically, the holes were a sign of imperfection, and until modern times, cheese makers would try to avoid them. It has a piquant, but not very sharp, taste. Three types of bacteria are used in the production of Emmentaler: Streptococcus thermophilus, Lactobacillus, and Propionibacterium freudenreichii. In the late stage of cheese production, P. freudenreichii consumes the lactic acid excreted by the other bacteria, and releases carbon dioxide gas, which slowly forms the bubbles that make holes.”
 I didn’t take any pictures during any of the making sessions but be assured the procedure is not that dissimilar from other hard cheeses I have made.  The only real difference is that you add the Propionic Shermanii to the milk at the same time as the Thermophilic culture and let it ripen for the specified time.  Add Rennet, cut the curd, stir for a long, long time, then press.

Once pressed, you have to leave it in the cheese cave for a week, turning it daily, then remove and keep it at room temperature (21°-24°C) for two to three weeks.  This is to let the eyes develop and the cheese swells at the top, bottom and the sides begin to bulge.  This is unlike any other cheese I have made.  You also have to turn and wipe with a brine solution daily to help the rind form.  It even smells like Swiss cheese now after a week.  Here is a photo of a week old cheese.  Note the swelling sides.

After the eye formation is complete it gets returned back to the cheese cave for another three months for final ripening and is turned three times a week and wiped in the brine solution at the same time.  This cheese is not normally waxed.  I was looking forward to the day that I cracked open this cheese.
Well, the four months were up after a long wait.  When we cracked open the wheel and this is what we found.

 There was a 3cm split on the top and it was a little infected with Penicillium Roqueforti, however, the Propionic Shermanii culture did its work.  Well, some of the work in most part of the cheese.  I believe that even though I gave the wheel a wash of brine a couple of times a week as per the recipe after I let the eyes form, the rind is far too thick.  I think that because the cheese was not waxed, as stated in the recipe, it just hardened too much.

Since this time I have waxed it after about three weeks of eye development.  It makes for a more moist cheese however the eyes do not form as big.

Now, how did it taste I hear you ask?  Well, it tasted like a Swiss-type cheese as you can buy in the supermarket, however, there was an obvious difference due to the Penicillium Roqueforti culture.
It was very nice, and both Kim and Pam (Kim’s Mum) agreed that it was a very tasty cheese.  The rind had a very strong flavour and as you can see more eyes formed closer to the rind than in the centre.  Here is it sliced on a platter.

 The quarter I served up was very holy indeed.  Easy to cut and great flavour with a plain cracker.  I really liked the extra flavour in the blue vein part!

When made commercially this cheese is made in 60-80 kg wheels, which aids the uniformity of the eye formation.  Apparently, from what I have read, the bigger the Emmental, the larger and more frequent the eyes.
Now last week, I cracked open a wheel of Emmental that I made in February this year.  This is what it looked like.

After I took the wax off, I was pleased to note that it still had a nice yellow rind.  As you can see I used Jersey Milk, which was about 4.2% butterfat.

 It sliced well, and if you look closely, it has many hundreds of tiny holes.  I don’t think that I put in enough  Propionic Shermanii, or it may have been too hot in Summer when it was resting at room temperature during hole formation.

 Anyway, it still tasted nutty and smooth.  This is a fantastic cheese for anyone who has a little patience, and I recommend it after you have a few other kinds of cheese under your cheesemaking belt!

 Emmental cheese definitely sounds like a candidate for a video tutorial.  Maybe next Friday.  What do you think?

Filed Under: Recipes Tagged With: Emmentaler

Caerphilly Cheese

11/07/2011 By Gavin Webber 15 Comments

Yearning for a cheese that would be on the table quickly? Caerphilly cheese is the cheese that you are after. It has Welsh/English origins, and is a lightly pressed cheese that ripens in just 3 weeks.

Here is a bit of history about Caerphilly from Wikipedia;

Caerphilly cheese is a hard, white cheese that originates in the area around the town of Caerphilly in Wales, although it is now also made in England, particularly in the South West and on the English border with Wales. It was not originally made in Caerphilly, but was sold at the market there, hence taking the town’s name.

Caerphilly is a light-coloured (almost white), crumbly cheese made from cow’s milk, and generally has a fat content of around 48%. It has a mild taste, with its most noticeable feature being a not unpleasant slightly sour tang.

It is rumoured that the cheese was developed over time to provide the coal miners of the area with a convenient way of replenishing the salt lost through hard work over ten-hour shifts underground and so was a staple of the diet of the coal miners.

So here is my method for making it. I used the recipe out of Making Artisan Cheese by Tim Smith and modified it a little.

Caerphilly Cheese

  • 7.6 litres whole milk (2 gallons)
  • 1/4th teaspoon (about 2 ml) mesophilic culture
  • 1/8th teaspoon (about 1 ml) calcium chloride diluted in 60ml cool unchlorinated water
  • 5/8th teaspoon (about 3 ml) liquid rennet diluted in 60ml cool unchlorinated water
  • 2 tablespoons non-iodized salt

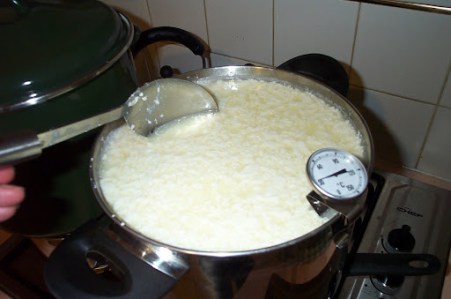
Heat milk to 32°C user double boiler (I use a smaller saucepan under the large pot).

Add the calcium chloride if you are using homogenised milk. Stir for a minute. Then add the starter culture and stir for another minute. Cover and let rest for thirty minutes at target temperature.

Maintaining the temp of 32°C (90°F), add the rennet to the milk, stir for two minutes, then cover. Let mixture sit for forty minutes at the target temperature, or until you get a clean break.

Cut the curds into 6mm (¼ inch) cubes, keeping the size as uniform as possible.

Slowly raise the temp to 33°C (92°F); this should take about ten minutes. Hold the curd at the target temp for forty minutes and be sure to stir frequently to keep the curds from matting. Let rest at target temp for five minutes.

Drain the curds into a cheesecloth lined colander, and let whey drain for a 5 minutes. Cut the curds into 2.5 cm (1 inch) thick slabs, and stack on top of one another. Turn the stack over, top to bottom, two times in ten minutes. This will assist in draining a lot of whey from the curd.

Using your clean hands, break the curds into thumbnail-sized pieces, and blend with salt.

Fill a cheesecloth-lined 1kg cheese mould with the salted curds.

Cover the curd with one corner of the cheese cloth, lay the follower on top, and press at 5kg (10 pounds) for ten minutes.

Remove the cheese from the press, take it out of the mould, and unwrap the cheesecloth. Turn the cheese, and rub a layer of salt on both top and bottom before rewrapping with cheese cloth. Press at 5kg (10 pounds) for ten minutes. Repeat the same procedure (salt), pressing at 7.5 kg (15 pounds) for twenty minutes. Repeat the same procedure, pressing at 7.5 kg (15 pounds) for sixteen hours. I finished this stage at 6 pm on Saturday evening, so I had to wait until 10 am Sunday morning for the next part.

Take the cheese out of the cheese mould, and let it air dry on a cheese mat and cheese board for about 3-4 days. Make sure you turn the cheese several times a day to ensure even drying and fat distribution.

When the cheese is dry to touch, it is ready to be ripened. Place in your cheese cave at 13ºC (55ºF) at 80-85% humidity for three weeks, turning several times a week. No need to wax this cheese. It will form a rind, and if any mould develops, simply rub the cheese with cloth dipped in some brine. The salt in this cheese retards mould growth anyway.

At this time of the year in Australia, you could find a cold cupboard to ripen your cheese in if you don’t have a fridge that you can get warm enough.

This cheese has been profiled on Cheesemaking Help, which is the blog of Ricki Carroll’s New England Cheesemaking Co.  I was very pleased when they asked my permission to repost my recipe!

I have been making this cheese every two months for the past two years, and it never fails to please family and friends.  Any easy, quick, and tasty cheese to make at home.

Filed Under: Recipes Tagged With: Caerphilly

  • « Previous Page
  • 1
  • …
  • 20
  • 21
  • 22
  • 23
  • Next Page »

Follow Us via Social

FacebooktwitterpinterestrssyoutubeinstagramFacebooktwitterpinterestrssyoutubeinstagram

Cheese Making Kits

Cheeseman.tv Merchandise

Stay Fresh Cheese Bags Mug
0:00
1:0:07
  • LGC103 - Dan Leighton, from Extinct Cheeses to Medieval Re-enactments
Subscribe on Apple Podcasts

Archives

Tags

Aging Blue Brine Caerphilly Camembert Cheese Cave Cheese Press Colby Cream Cheese Curd Cutter Drunken Cow eBook Emmentaler Equipment Farmhouse Cheddar Feta Gavin Halloumi Jarlsberg Kits Monterey Jack Mould Ripened Cheese Moulds Mozzarella Parmesan Parmigiano Reggiano Podcast Queso Fresco Raw Milk Rennet Ricotta Ricotta Salata Romano Salt Sanitisation Starter Cultures Stilton Storage Technique Tzafatit Video Tutorial Waxing Wensleydale Whey Ricotta Workshops

Subscribe to Cheese Podcast

Apple PodcastsAndroidby EmailRSS

Subscribe to Cheeseman.TV

Podcast Reviews

  • Number One Cheese Podcast
    October 14, 2023 by Gene 321 from Australia

    Inspirational, motivational, incredible knowledge of cheese history and production, a great teacher with a twist of Aussie humor and an all round nice guy who knows his cheese. I’ve been listening to Gavin for many years now and gained so much knowledge and inspiration from just listening to his podcasts. If you’re interested in cheese, Gavin is your man.

  • I am so hooked on cheese making now.
    July 25, 2023 by Bennyssimoo from New Zealand

    Thank you Gavin. I feel like I know you as if you were my neighbor and you really got me lost in cheese now

  • Love it. Keep it up!
    February 12, 2022 by Corknip from Denmark

    Excellent podcast. Started the home making adventure last month and have been catching up on all the past episodes and YouTube videos. it is a gold mine of shared knowledge. Thank you!

  • So funny!!!!
    June 15, 2020 by purple quaqamale from United States

    Little green cheese is so funny

  • Great podcasts
    June 14, 2020 by Chrissy Curd Nurd from Australia

    I’ve just started cheese making at home,Gavin ‘s podcasts are so informative. I also watch his you tube tutorials. Thanks for your great work!!

  • An excellent guide to artisan cheese!
    January 14, 2020 by N.K.13 from Australia

    I recently became aware of Gavin’s lovely YouTube channel and podcast and it’s been incredible. His competence and comprehensive explanations leave you craving more. Much like a good cheese! Cheers Gavin!

  • Perfect for Cheesemakers of all levels!
    December 3, 2018 by Viki Leeasa from Thailand

    I love that this podcast does not just have helpful tips and tricks on cheese making, but also stories and news from the cheese world, as well as nice little anecdotes from the host.A big fan from Thailand!

  • If you think you want to make cheese, listen to this!
    November 30, 2018 by paulsaw from United States

    Gavin Webber’s Little Green Cheese is By Far the best podcast I have ever heard! A truly informative and quality production!

  • Great program
    October 9, 2018 by p37dg9q14 from United States

    Very informative and enjoyable podcast. I started at episode 1 and currently listening to 25. I’ll be giving cheesemaking a go in the next week. Mike J from Oceanside CA

  • Great podcast
    September 13, 2018 by nicole_elias from Australia

    I have a long commute to and from work and have worked my way through the back catalogue of these podcasts. Enjoyed every one of them and hope for many more to come. Thanks Gavin! Keep up the great work. Cheers, Nicole

Little Green Workshops

Copyright © 2026 · Gavin Webber