• About
  • Contact Me

Little Green Cheese

Cheese making at home with Gavin Webber the Cheeseman

  • Home
  • Blog
  • Cheese Courses
  • Cheese eBooks
  • Podcast
  • Videos
  • Cheese Making Kits
  • Support Me!
  • Live!

Cut Curd Size

18/03/2013 By Gavin Webber 2 Comments

Ever wondered why different cheese recipes required different cut curd sizes?

Well, so do a lot of budding curd nerds from the looks of this weeks email.  It comes from Dave who lives somewhere in the U.S.

Hi Gavin,

I just wanted to thank you so much for what you’re doing. A friend and I are trying to learn to make cheese and other things from home, but most sites put a high premium on the knowledge. I live in the U.S. and our economy is starting to fall apart. We decided that not only is it better to be natural but, it is also a kind of security to know how to do these things if there ever is an economic crisis – which the signs say there is going to be one. So to repeat, most folks out there are capitalizing on the need but you’re doing a lot of this stuff for free. It means a lot to me and I’m sure to many others. You’re a kind of mother culture for many other aspiring cheese-makers and “greenies.” Thank you.

That being said, I have a question that plagues me and my newbie cheese-making friend: Why do cheese curds need to be cut in a particular size if we are going to break them up in the first place? It seems like an arbitrary step since every batch of cheese is ultimately broken down to the same size. What are we intellectually missing here? Why do they have to be cut uniform if they’re gonna be reduced and broken by stirring. The way it looks to us is like we’re told to cut curds in one inch squares and then throw them into a blender. We’re told that the size of the cubes will determine the moisture and the texture of the cheese. Do you see the confusion? You’re advice is much appreciated and thanks so much for what you’re doing for us. It’s strange to me how you’re having a global impact from your own home!

Thanks, Dave

Thank you Dave.  I have never been referred to a mother culture before, but it sounds nice and earthy.   A father culture, definitely!

cut curd size at 6 mm
Caerphilly curds cut at 6 mm (1/4 inch) for a drier cheese.

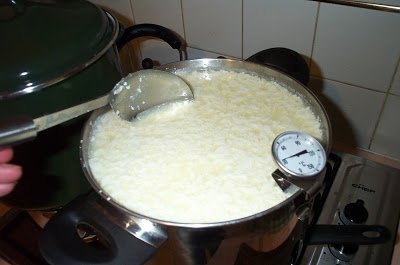
So to answer your question, there is a very good reason why we cut curds size differently or in fact in some cheeses, we don’t cut at all.  It all has to do with the moisture content of the finished cheese.  The smaller the curd cut, the more whey that is expelled.You will also notice that the flocculation time (time taken to set after adding rennet) is much longer in a cheese like Camembert (60 minutes), than say Parmesan (45 minutes or less).  It makes a big difference to the finished product.

A soft cheese usually has a higher flocculation time, and a larger curd cut, keeping more moisture in the cheese.

A hard cheese on the other hand has a lower flocculation time, and a smaller curd cut, releasing more whey for a firmer, drier cheese.

One thing I will recommend is that once the curds are cut, let them ‘heal’ for 5 minutes before stirring again.  You will find that the cubes will stay together better, and just shrink during stirring, expelling whey as you cook the curds.  Curds should always be stirred gently, so that they are not broken apart forcefully.  In fact, everything about cheese making is very Zen like.  Slow and methodical makes the best cheese.

Enjoy your new curd knowledge!

Filed Under: Workshops Tagged With: Curds, Technique

Making Your Own Curd Cutter

26/02/2013 By Gavin Webber 17 Comments

My cheese pal, David, who lives in Manitoba, Canada has kindly offered to share the instructions on how to make the cheese curd cutter that he made me.

It was his way of saying thank you for all the cheese making video tutorial that I have made over the last few years.  What a nice bloke!

Anyway, here are his instructions, to which I have added metric measurements.

Making Your Own Curd Cutter

making your own curd cutter
Maple curd cutter made by David Dawson
Curd Cutter made for a 8 litre (2 gallon) pot.

David’s note:  I have made 3 harps, one stainless steel and two from wood.  The best one is shown here I will describe how I made this one.

The height of the curd cutter is the depth of your cheese making pot PLUS about 4 inches (100 mm).  The width of the harp is half of the diameter of your cheese making pot.  So, if your pot is 10 inches (254 mm) deep and 10 inches across, your harp wants to be 14 inches (355 mm) high and 5 inches (127 mm) wide.

Use a hard close-grained wood such as maple.  Cut two pieces approx 5/8 inch (16 mm) wide x 3/16 (5 mm) thick x your desired total height.  Mark off the max depth of your pot.  Draw a centre line down the length of that part of the wood that will be in the pot.

Drill a 3/16 (5 mm)hole at the end but leaving enough wood at the end so as not to be too weak and to hold a 3/16 dowel.  Then mark off every ½ inch (13 mm) to about 1 inch (25.4 mm) above your curd depth.  Drill 1/16 (1.5 mm) holes at every mark.  Drill one hole in the middle at 3/16 (5 mm) for a second re-enforcing dowel. See photo.

Cut 2 pieces for the handles 25mm x 16mm (1 inch x 5/8 x the half the diameter of your pot MINUS  3/8 inch) 10mm.  Cut two pieces of 5mm (3/16 inch) dowel x half the diameter of your pot.

Mix up some 2-part epoxy glue and glue the wooden parts together.  Use a clamp or an elastic band to hold the handle end in place while the glue sets.

Lay it on wax paper on a flat surface and make sure the long side pieces are parallel.  When the glue has dried, some very small round-headed screws (eg ½ inch x 1/16) into the handle pieces will give added strength.

Pre-drill the screw holes to avoid splitting the wood. You can just see these screws on the bottom of the photo.

Thoroughly sand everything down and while doing it round off the end and all the corners.  Pay particular attention to the long pieces that will be in the curd as these will in effect be cutting as well.

Now thread nylon fishing line back and forth through the holes.  Tie off at the bottom and, working from
bottom to top, pull tight and finally tie off at the top.  Use fisherman’s non-slip knots.

Mix a quantity of 2-part epoxy glue and thin it down with a little methyl hydrate (alcohol) and brush it all over.  If you can get the glue to fill the holes where the nylon line goes through, that is good because it will prevent pieces of curd getting stuck in there.  When it is dry, very lightly sand down the
wood with very fine sandpaper (eg 400 grit) – be careful not to sand the nylon – and give it a second coat.  The glue will seal the knots in the nylon and help to prevent them coming undone.

Note:  2-part epoxy is usually considered ‘food safe’ though no guarantees are implied here with your brand of epoxy.

Gavin’s note:  David does not take orders, which is why he gave me permission to post these instructions so that you can make your own curd cutter.

I have used this curd cutter many times now, and David even sent me on for my 14 litre pot, which is a little larger.  To clean it before and after use, I wash it with a weak bleach solution (1 capful to 1 litre of water) then rinse again with clean water afterwards.

It is a great tool, worthy of construction and use by the home cheese maker.

Best of luck with your construction project.

Filed Under: Hardware Tagged With: Curd Cutter, Technique

Stilton Testimonial

04/02/2013 By Gavin Webber 9 Comments

If anyone is wondering if the recipes that I post actually get results if you follow them, then this post is for you.  It’s a bit of a Stilton testimonial!

The other day I received two delightful emails from one of my readers, Chris who writes about a Stilton cheese that was made following my recipe and video tutorial.

Here is Chris’ first email;

Hello Gavin

The attached photos are of my first attempt at “Stilton”, the result was superb, I took some to a dinner down in Tasmania, the host served two ‘blues’ after dinner, my “Stilton” and a top King Island, initially some guests were reluctant to try the home-made  but at the end of the night the only cheese left was half the King Island ! I like it so much #2 is in the cave, #3 will be made this week-end.

I recently bought a cheese trier from www.thecheesemaker.com delivered in 11 days and half the price charged locally.

I have watched all your videos, they have been most helpful, so far I have made Parmesan, Camembert,  Cheddar (farmhouse and normal), Wensleydale,  Stilton and Ricotta, not one failure. The cheese cave is a full size ‘fridge fitted with a $50 external thermostat from Jaycar.

Chris’ Stilton.  Looks delicious!


Here is the second email

I had read a couple of books on cheese making before I discovered your site, the videos were really helpful, if a picture is worth a thousand words a video must be billions !My cave really works well, I have it set for a temp. range of 12-14°C at the moment, even though it is in a shed, when the shade temp here was 45.5°C it held at 13.5°C.  I am afraid my last email said I bought the external thermostat from Jaycar, my mistake, I bought it from mashmaster, see http://www.mashmaster.com.au/p/365439/fridgemate-mkii-digital-temperature-controller-kit.html
My blue cheeses all age at the above temp, I like a strong cheese, so 4 months is right for the Stilton, I tried the one in the cave last week at 3 months it is still a bit mild. One thing with making Stilton, I drain in a cheese cloth but don’t line the mould with cloth, the cheese comes out much smoother and is easier to dress before aging.

Cheers

Chris

The Stilton enjoyed with a nice glass of red wine.

Here is my reply;

Hi Chris,

Great result. I often wonder if people can replicate my results by watching my video tutorials, and you have just confirmed that you can!

That is great news about your Stilton. I really need to get my cheese cave sorted out. I am thinking of converting an old bar fridge with a similar external thermometer.

Kind regards,

Gavin

Thanks for the big vote of confidence Chris.  It makes producing this cheese blog all the more worthwhile when I receive a testimonial like that! I love that you have tried to make so many different types of cheese, all from watching my video tutorials.

I didn’t really know how much the videos helped, so now I do!

Filed Under: Taste Test Tagged With: Stilton, Technique, Video Tutorial

  • « Previous Page
  • 1
  • …
  • 12
  • 13
  • 14
  • 15
  • 16
  • 17
  • Next Page »

Follow Us via Social

FacebooktwitterpinterestrssyoutubeinstagramFacebooktwitterpinterestrssyoutubeinstagram

Cheese Making Kits

Cheeseman.tv Merchandise

Stay Fresh Cheese Bags Mug
0:00
1:0:07
  • LGC103 - Dan Leighton, from Extinct Cheeses to Medieval Re-enactments
Subscribe on Apple Podcasts

Archives

Tags

Aging Blue Brine Caerphilly Camembert Cheese Cave Cheese Press Colby Cream Cheese Curd Cutter Drunken Cow eBook Emmentaler Equipment Farmhouse Cheddar Feta Gavin Halloumi Jarlsberg Kits Monterey Jack Mould Ripened Cheese Moulds Mozzarella Parmesan Parmigiano Reggiano Podcast Queso Fresco Raw Milk Rennet Ricotta Ricotta Salata Romano Salt Sanitisation Starter Cultures Stilton Storage Technique Tzafatit Video Tutorial Waxing Wensleydale Whey Ricotta Workshops

Subscribe to Cheese Podcast

Apple PodcastsAndroidby EmailRSS

Subscribe to Cheeseman.TV

Podcast Reviews

  • Number One Cheese Podcast
    October 14, 2023 by Gene 321 from Australia

    Inspirational, motivational, incredible knowledge of cheese history and production, a great teacher with a twist of Aussie humor and an all round nice guy who knows his cheese. I’ve been listening to Gavin for many years now and gained so much knowledge and inspiration from just listening to his podcasts. If you’re interested in cheese, Gavin is your man.

  • I am so hooked on cheese making now.
    July 25, 2023 by Bennyssimoo from New Zealand

    Thank you Gavin. I feel like I know you as if you were my neighbor and you really got me lost in cheese now

  • Love it. Keep it up!
    February 12, 2022 by Corknip from Denmark

    Excellent podcast. Started the home making adventure last month and have been catching up on all the past episodes and YouTube videos. it is a gold mine of shared knowledge. Thank you!

  • So funny!!!!
    June 15, 2020 by purple quaqamale from United States

    Little green cheese is so funny

  • Great podcasts
    June 14, 2020 by Chrissy Curd Nurd from Australia

    I’ve just started cheese making at home,Gavin ‘s podcasts are so informative. I also watch his you tube tutorials. Thanks for your great work!!

  • An excellent guide to artisan cheese!
    January 14, 2020 by N.K.13 from Australia

    I recently became aware of Gavin’s lovely YouTube channel and podcast and it’s been incredible. His competence and comprehensive explanations leave you craving more. Much like a good cheese! Cheers Gavin!

  • Perfect for Cheesemakers of all levels!
    December 3, 2018 by Viki Leeasa from Thailand

    I love that this podcast does not just have helpful tips and tricks on cheese making, but also stories and news from the cheese world, as well as nice little anecdotes from the host.A big fan from Thailand!

  • If you think you want to make cheese, listen to this!
    November 30, 2018 by paulsaw from United States

    Gavin Webber’s Little Green Cheese is By Far the best podcast I have ever heard! A truly informative and quality production!

  • Great program
    October 9, 2018 by p37dg9q14 from United States

    Very informative and enjoyable podcast. I started at episode 1 and currently listening to 25. I’ll be giving cheesemaking a go in the next week. Mike J from Oceanside CA

  • Great podcast
    September 13, 2018 by nicole_elias from Australia

    I have a long commute to and from work and have worked my way through the back catalogue of these podcasts. Enjoyed every one of them and hope for many more to come. Thanks Gavin! Keep up the great work. Cheers, Nicole

Little Green Workshops

Copyright © 2026 · Gavin Webber